
This document is a Jupyter/Colab notebook. You can run it in Colab.
To use a notebook in DevSite:
- Put the Jupyter notebook (IPYNB file) in your DevSite content directory.
- Include the
Book:andProject:metadata at the top of the first cell. - Use the
devsite2command-line tool or Content Publisher to stage or publish.
$ devsite2 stage third_party/devsite/developers/en/devsite/notebook.ipynb
15 files will be uploaded:

third_party/devsite/developers/en
  ...
  Edited: /devsite/notebook
  Edited: /devsite/notebook.ipynb

Your changes are now staged at:
https://developers.devsite.corp.google.com
Note that this publishes the converted page and the raw notebook file.
Add the .ipynb extension to the URL to download the notebook file from
the site. For instance, you can
download this notebook.
Check out the Burning Pen presentation for an overview of why TensorFlow chose to use notebooks.
Background
Jupyter notebooks mix documentation and executable code. Colab is a managed environment for running Jupyter notebooks and is available in two versions: internal and external.
The following are the primary advantages of using notebooks as docs:
- You can easily test that the code snippets work.
- No details are left out.
- The doc's code snippets can't be out of sync with the source code.
The following are the main disadvantages of using notebooks as docs:
- Including all the necessary code can be verbose.
- Notebooks are stored as JSON files making diffs, merges, and reviews more difficult.
Tools
There are several tools that can make notebook JSON easier to work with:
- Critique handles internal reviews well. It only shows the converted Markdown.
- ReviewNB may help for GitHub reviews.
- TensorFlow's docs team maintains command-line tools for standardizing and linting notebooks.
- Colab has several helpful options built in:
- Edit > Lint notebook
- Edit > Format cell
- Tools > Diff notebooks
g4 lintandg4 fixdon't work on notebooks.
Supported languages
The most common programming language used in notebooks is Python, but the format itself is language agnostic. JuPyteR stands for "Julia, Python and R".
Jupyter kernels exist for many other languages. In addition to Python, Colab supports Swift and R.
The DevSite notebook integration described here is language agnostic and should work equally well with notebooks written for other Jupyter kernels. TensorFlow uses this for its Swift notebooks.
Writing notebooks
Notebooks are composed of a mixture of Markdown and code cells. This cell is a Markdown cell.
The cell below is a code cell. Code cells produce outputs. Outputs are stored in the notebook file, and shown on the page under the code cell. Here are some examples:
print("Hello DevSite!")
Hello DevSite!
The print function prints to the cell output.
If the final expression in a cell is not assigned to a variable, it is automatically printed:
# This is a list
my_list = [1, 2, 3]
my_list
[1, 2, 3]
Use a leading ! to execute commands with bash:
pwd/export/hda3/borglet/remote_hdd_fs_dirs/0.colab_kernel_brain_frameworks_cpu_markdaoust.kernel.markdaoust.444802926898.14b334fb3717c109/mount
Jupyter includes a rich display system that allows objects to define how they should be displayed.
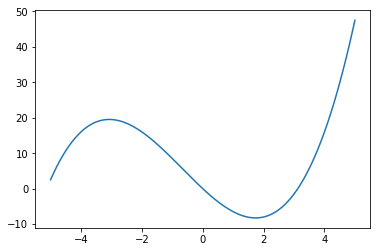
The code in the cell below generates the plot:
import numpy as np
import matplotlib.pyplot as plt
x = np.linspace(-5,5, 201)
_ = plt.plot(x, -8*x + x**2 + x**3/2)
Workflows
When editing a notebook, it's important to keep in mind that there are two versions of Colab: internal and external.
Both include an extensive suite of pre-installed packages.
There are two important differences between internal and external Colab:
- Internal Colab has access to Google resources (Piper, Borg, Google3).
- External Colab has access to the internet.
For text edits, this has no effect. If you're executing the notebook and plan to publish the output, you should consider running it in external Colab. There are two main reasons for this:
- It ensures you don't leak Google-internal details.
- The results reflect what a non-Googler would see.
The following subsections describe the workflows for editing a notebook, in your DevSite content directory, using both internal and external Colab.
Internal Colab
To add a notebook from Drive to your site:
- Open the notebook using internal Colab.
- Select File > Save a copy in Piper.
- In the save dialog, set your CitC client and file path to save the notebook to your DevSite content directory.
To edit an existing notebook using internal Colab:
Open the file in Cider.
Cider's edit window shows the notebook's raw JSON.
In the bottom-right corner of the edit window, select Related Links > Edit in Colab.
Edit the notebook.
Changes are automatically saved back to the CitC workspace.
In both cases, use the
devsite2
command-line tool or the
Content Publisher
to stage or publish.
External Colab
The simplest way edit a notebook from your DevSite content directory using external Colab is as follows:
Starting from the file in your DevSite content directory opened in internal Colab, select File > Save a copy in Drive.
A new internal Colab tab opens, connected to the Drive file.
Switch to the external Colab view of the Drive file by replacing
colab.corp.googlewithcolab.sandbox.googlein the URL.Edit and execute the notebook in external Colab.
Select Runtime > Restart and run all to cleanly regenerate all outputs.
Switch back to the internal Colab view of the Drive file by replacing
colab.sandbox.googlewithcolab.corp.googlein the URL.Select File > Save a copy in Piper to save the Drive file back to your CitC workspace.
When editing, be careful to edit only one view of the file. It's easy to accidentally overwrite changes if you are not careful.
For a quick way to switch between the two Colabs, you can add a "bookmarklet" containing the following code:
javascript:(
  function(){
    var url=window.location.toString();
    if (!url.includes('google.com/drive')){return;}
    if (url.includes('colab.corp')){
      url=url.replace(/colab\.corp/, 'colab.sandbox');
    } else {
      url=url.replace(/colab\.(research|sandbox)/, 'colab.corp');
    }
    window.open(url,'noopener'); })()
Execution and testing
While notebooks are executable, this DevSite compiler makes no attempt to run or test your code. As much as possible, this is meant to be a WYSIWYG operation, publishing the notebook exactly the way it was submitted.
Testing and execution is the responsibility of the author.
After editing a notebook in Colab, select Runtime > Restart and run all to ensure that the notebook runs end to end, and that the outputs are generated in order.
You can use a
colab_notebook_test
to ensure that this is enforced on presubmit. There are a few things you should
note:
- It requires a TAP setup.
- It runs internal Colab.
The default settings check that the output is identical to what's saved in the notebook.
Setting
default_cell_diff="ignore"relaxes this check, but then only checks that the notebook executes, and does not check the outputs.
A typical BUILD rule looks like:
load("//research/colab:build_defs.bzl", "colab_notebook_test")
colab_notebook_test(
  name = "notebook_test",
  ipynb = "notebook",
)
Limitations
The notebook converter supports hundreds of notebooks on tensorflow.org, but it is not a perfect solution and has some limitations.
Markdown
Jupyter/Colab uses a slightly different Markdown syntax compared to DevSite. The notebook compiler attempts to patch these differences.
For example, DevSite's Markdown compiler requires a blank line before a code block or a Markdown list, but Colab's does not. This file leaves out those blank lines but still displays correctly.
If a notebook displays correctly in Colab/Jupyter but is broken in DevSite, please file a bug.
HTML/JavaScript outputs
Some libraries generate complex interactive HTML/JavaScript applications in notebook-cell output. A good example of this is TensorBoard.
The compiler wraps HTML outputs in a
{% framebox %}
so simple things may work. If you do plan to publish notebooks with
complex output, be sure to do the following:
- Test it carefully.
- Follow site policy for JavaScript.